Installing OpenStack on OpenStack and enabling external network on the upper layer of OpenStack.
For testing I need to install an All-in-One OpenStack in a VM on our bare-metal OpenStack. Installing an All-in-One OpenStack is easy, but it requires that the VMs on the All-in-One OpenStack be accessed from other VMs on the bare-metal OpenStack, which is a challenge. I’ll show you how installing OpenStack on OpenStack works in this blog.
Firstly, here is the diagram showing what I will set up.
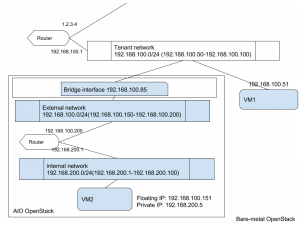
The goals are to let VM1 and VM2 talk to each other, and let VM2 have Internet access.
I am going to install an All-in-One OpenStack on a bare-metal OpenStack. Firstly, I need to create a tenant network in the bare-metal OpenStack for a VM running All-in-One OpenStack. When doing that, I reserve some IPs and use them in the All-in-One OpenStack as floating IPs (192.168.100.150-192.168.100.200). The bare-metal OpenStack is set up properly and there is already an external network in the bare-metal OpenStack so that VM1 can access the Internet via a virtual router, thus I just need to create a tenant network. To do that, use
neutron net-create mynet

neutron subnet-create --name mysubnet --dns-nameserver 8.8.8.8 --allocation-pool start=192.168.100.50,end=192.168.100.100 mynet 192.168.100.0/24
In this case, it will create a VxLAN tenant network. But other network types should work as well. Also remember to create a router for this tenant network to access the Internet.
Now I can start a VM for the All-in-One OpenStack. The VM needs at least 8GB ram and 2 CPUs to run everything and get a reasonable performance for testing. Once the VM is up, you can test if the VM has Internet access before installing OpenStack.
There are many ways to set up an All-in-One OpenStack. The easiest way is probably using PackStack, or you can use Puppet modules. Normally when launching a VM in OpenStack, the VM has one network interface called eth0. I am going to use that as the external network interface for the All-in-One OpenStack.
PackStack can do that automatically; I just need to add some arguments to the packstack command, as in https://www.rdoproject.org/networking/neutron-with-existing-external-network/.
packstack --allinone --provision-demo=n --os-neutron-ovs-bridge-mappings=extnet:br-ex --os-neutron-ovs-bridge-interfaces=br-ex:eth0 --os-neutron-ml2-type-drivers=vxlan,flat
In this example, it creates a new br-ex bridge and connects eth0 to it. It also maps the logical name “extnet” to br-ex so I can reference it in my external provider network in Neutron. “flat” is added to the type driver because the external provider network is a flat network.
If using Puppet modules, or another method that doesn’t do this, I need to create br-ex manually.
Edit /etc/sysconfig/network-scripts/ifcfg-eth0 so it becomes a port of br-ex.
DEVICE=eth0

NAME=eth0

DEVICETYPE=ovs

TYPE=OVSPort

OVS_BRIDGE=br-ex

ONBOOT=yes

BOOTPROTO=none

NM_CONTROLLED=no
Edit /etc/sysconfig/network-scripts/ifcfg-br-ex
ONBOOT="yes"

PERSISTENT_DHCLIENT="yes"

DEVICE=br-ex

NAME=br-ex

DEVICETYPE=ovs

OVSBOOTPROTO="dhcp"

TYPE=OVSBridge

OVSDHCPINTERFACES=eth0

OVS_EXTRA="set bridge br-ex other-config:hwaddr=fa:16:3e:06:95:92"

DEFROUTE="yes"
Here br-ex is created as an OVS bridge. It uses DHCP to get an IP address from the bare-metal OpenStack’s tenant network (192.168.100.0/24) via eth0. Therefore we need an extra option to set its MAC address to be the same as eth0 (as below) for DHCP to work. Neutron only assigns IP addresses to known MAC addresses and the mapping is put into Dnsmasq’s config. If we don’t specify the MAC address here, br-ex won’t be able to get any IP address from the DHCP server. After making all these changes, restart network service.
2: eth0: mtu 1500 qdisc pfifo_fast master ovs-system state UP qlen 1000

link/ether fa:16:3e:06:95:92 brd ff:ff:ff:ff:ff:ff

inet6 fe80::f816:3eff:fe06:9592/64 scope link

valid_lft forever preferred_lft forever
Double check the config of br-ex and eth0 no matter which method you use to install All-in-One OpenStack, and make sure the network is working.
Now I can create networks in the All-in-One OpenStack. Note that the physical network name “extnet” is mapped to br-ex in Neutron’s config. The IP range of the external network is reserved previously and not overlapped with the tenant network in the bare-metal OpenStack. Also the external network has DHCP disabled and it is using br-ex’s IP address as the gateway.
neutron net-create public --router:external True --provider:physical_network extnet --provider:network_type flat

neutron subnet-create --allocation-pool start=192.168.100.150,end=192.168.100.200 --dns-nameserver 8.8.8.8 --name public_subnet --gateway 192.168.100.85 public 192.168.100.0/24 --disable-dhcp

neutron net-create private_network

neutron subnet-create --name private_subnet private_network 192.168.200.0/24

neutron router-create router1

neutron router-gateway-set router1 public

neutron router-interface-add router1 private_subnet
Next I will create an instance, VM2, with a floating IP.
Until now I can access VM2 from its host, the VM running All-in-One OpenStack but I can’t access to it from another VM in the same tenant network in bare-metal OpenStack, such as VM1.
In order to allow the instances in All-in-One Openstack to talk to the VMs in bare-metal OpenStack, such as VM1 in the diagram, there is one more thing to do on the bare-metal OpenStack. By default, Neutron creates an iptables rule to only allow traffic matching the VM’s IP/MAC address pair to get into the VM; other traffic will be filtered out, such as the following example.
Chain neutron-openvswi-s27a6fc06-7 (1 references)

target prot opt source destination

RETURN all -- 192.168.200.7 0.0.0.0/0 MAC FA:16:3E:86:6E:78 /* Allow traffic from defined IP/MAC pairs. */

DROP all -- 0.0.0.0/0 0.0.0.0/0 /* Drop traffic without an IP/MAC allow rule. */
However, since I am running an All-in-One OpenStack on the VM, I need the VM to see all traffic that targets the floating IPs that are associated with All-in-One OpenStack’s VMs.
There are two ways that you can let the VM see traffic targeting other IPs. One is to add extra IP/MAC pairs to the port of this VM in bare-metal OpenStack.
neutron port-update [Port-UUID] --allowed-address-pairs type=dict list=true mac_address=XXX,ip_address=YYY
The MAC address and IP address has to match the ones of the instance in All-in-One OpenStack. Since we are using DHCP for the tenant network in All-in-One OpenStack, the MAC/IP pair is unknown beforehand. Therefore I will use the second method which is to disable IP/MAC filtering so that this VM can see all traffic in the network.
To do that, I need to enable the port_security plugin in Neutron of the bare-metal OpenStack. On controller node, edit /etc/neutron/plugins/ml2/ml2_conf.ini
extension_drivers = port_security
Then restart neutron server.
systemctl restart neutron-server
Now I can disable port security on the port of the All-in-One OpenStack VM. Firstly, find the UUID of the port. Then use this command to disable security group first.
neutron port-update --no-security-groups [Port-UUID]
This means you need to use iptables in the VM to protect it. Next you can use the following command to disable port security:
neutron port-update [Port-UUID] --port-security-enabled=False
Now the VMs in All-in-One OpenStack are accessible from other VMs in the bare-metal OpenStack using floating IPs. On VM1, I can ssh to VM2 using its floating IP. In VM2, I can access the Internet.
References:
https://www.rdoproject.org/networking/neutron-with-existing-external-network/
“https://www.youtube.com/watch?v=8zFQG5mKwPk”
http://kimizhang.com/neutron-ml2-port-security/