Tempest is the official OpenStack test suite that runs integration tests against an OpenStack cloud to validate its healthiness and find out its (potential) problems. Tempest contains a list of test classes, in three categories, being API, scenario, and stress. API tests validate API functionalities; scenario tests simulate complex multi-step operations; stress tests run several jobs in parallel to see if the service can sustain high workload. Tempest uses its own client implementation rather than existing Python clients so that it can send fake or invalid requests to check if APIs are implemented correctly.
Setting up Tempest is a challenge as the documentation is not very clear. Some problem may not be caused by the configuration of Tempest but the setup of your cloud. Fortunately, there are several tools that can help users take advantage of Tempest without going through too much pain. In this series, we will show you how to run Tempest, standalone or with the help of another tool.
Part 1 describes how we use RefStack client to run Tempest tests. RefStack is a tool developed to assist DefCore capability testing. DefCore are a set of capabilities that an OpenStack cloud needs to possess in order to be certified by the OpenStack foundation. At the time of writing, 2016.01 is the latest definition consisting of 306 tests. (Since Tempest is under active development, 10 out of 306 tests are no longer valid if you check out the master branch of Tempest.)
The installation of refstack-client is very straightforward, as described in this document. In summary, there are 5 steps:
- Download source code
git clone https://git.openstack.org/openstack/refstack-client
- Install it into a local virtual environment
./setup_env
- Download test list of 2016.01
https://refstack.openstack.org/api/v1/guidelines/2016.01/tests?type=required
- Run the test
./refstack-client test -c ~/tempest.conf --test-list test-list-file-name
- Upload the test result to refstack.openstack.org (optional)
./refstack-client upload .tempest/.testrepository/[some-number].json
In the last step, you can choose to upload your result to refstack.openstack.org for the foundation to run statistical analysis and share with others. You can also upload private results so that they will be associated with your name. To do so, please follow this document.
The refstack-client document is very brief and simple, and the challenge is on step 4, where you prepare a suitable tempest.conf for Tempest. To do this, we need to understand what are in the DefCore capability tests, and enable those functionalities in our OpenStack. In this guide, we’ll set up an All-In-One (AIO) OpenStack (Mitaka release) which has all components in one host. We use Puppet modules to do the installation, e.g. according to these instructions. You can also run the same tests against a multi-node OpenStack.
The 2016.01 version of DefCore tests covers six components: Keystone, Glance, Cinder, Nova, Neutron, Swift. Because it only does API tests, you don’t have to install Horizon. So you need to enable all these services in tempest.conf.
[service_available]

cinder = true

neutron = true

glance = true

swift = true

nova = true
Apart from what has been set up by the above all-in-one installation script, we need to make some changes to the configuration to satisfy DefCore requirements.
2016.01 requires Nova to be able to resize an instance. Firstly, we need to enable that feature in tempest.conf (so Tempest will run resize tests), and provide two flavors so that Tempest can create the instance with one flavor, and resize it to the other flavor. Here we use default flavors, 1 (m1.tiny) and 2 (m1.small).
[compute]

flavor_ref = 1

flavor_ref_alt = 2

[compute-feature-enabled]

resize = true
For AIO OpenStack to be able to resize on a single compute node, we need to allow that in nova.conf.
allow_resize_to_same_host=True

scheduler_default_filters=AllHostsFilter
Then restart nova services.
service nova-scheduler restart

service nova-compute restart
2016.01 requires Swift to support versioning. We enable that in swift’s container config.
/etc/swift/container-server.conf
[app:container-server]

allow_versions = true
We also need to create two roles for Swift (if they don’t already exist).
openstack role create Member

openstack role create ResellerAdmin
Their names match the config in tempest.conf.
[object-storage]

operator_role = Member

reseller_admin_role = ResellerAdmin
And the account we use to run Tempest test should have these two roles, e.g. we create a new user called swiftop that holds these roles.
openstack user create swiftop --password a_big_secret

openstack role add Member --user swiftop --project openstack

openstack role add ResellerAdmin --user swiftop --project openstack
Then we need to create a file called accounts.yaml with the test account. RefStack client doesn’t allow dynamic credentials so we need to create test account beforehand and put it into the accounts.yaml file. (Consequently, you can’t ask Tempest to create networks for tests either and we need to create them before running Tempest as below.) For some reason some tests will fail if I use an admin account when running Tempest; that’s why I create a non-admin account here and use it to run the tests.
- username: 'swiftop'

tenant_name: 'openstack'

password: 'a_big_secret'

roles:

- 'Member'

- 'ResellerAdmin'
Next we need to do a few things for Neutron tests to run. When doing Puppet installation, we have enabled tunneling (for tenant network) and created an external network ‘public’ on bridge br-ex so that the host (where Tempest is running) can talk to instances in our AIO OpenStack. Then we need to create a tenant network (network type vxlan) for Tempest to use.
neutron net-create mynet

neutron subnet-create mysubnet

neutron subnet-create --name mysubnet mynet 192.168.0.0/24

neutron router-create myrouter

neutron router-gateway-set myrouter public

neutron router-interface-add myrouter mysubnet
Then if an instance needs to be accessed from the host, we can create a floating IP and assign the IP to the instance. At the host we can use this floating IP to talk to the instance. One important thing to remember is to allow port 22 and icmp in the ‘default’ security group, which will be used when creating instances in the tests.
Then in tempest.conf, we need to tell Tempest about the networks.
[compute]

fixed_network_name = mynet

[network]

public_network_id = [UUID of ‘public’ network]

floating_network_name = public
In some 2016.01 tests, Tempest needs to ssh into the instance to verify some things, such as the cpu number and hostname. Since we use cirros image in all tests, there is no need to use ssh key to login. We’ll supply username/password in tempest.conf as login details.
[validation]

run_validation = true

connect_method = floating

image_ssh_user = cirros

image_ssh_password = cubswin:)
Tempest needs two images, we can upload the same cirros images twice to get two UUIDs, and put them in tempest.conf.
[compute]

image_ref = [UUID of cirros image]

image_ref_alt = [UUID of another cirros image]
Lastly, we need to specify the keystone uri.
[identity]

uri = http://localhost:5000/v2.0

uri_v3 = http://localhost:5000/v3

auth_version = v3
We’ll run Tempest on the same host as the AIO OpenStack so we use localhost here. Since Mitaka, Keystone v3 is the recommended version therefore we use v3 as the auth version.
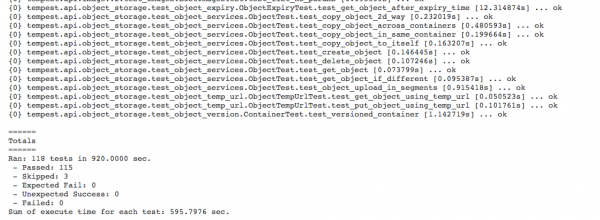
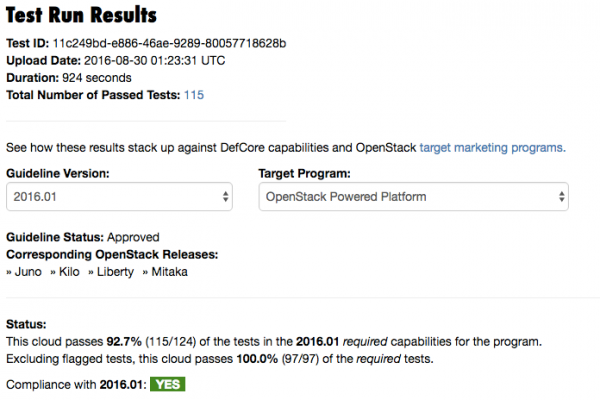
With all these changes in place, you can go ahead to run refstack tests, and upload your result to refstack.openstack.org.
You’ll get a green YES in your result page meaning that your cloud is in compliance with 2016.01 if your cloud is set up properly.
References:
- Nova Resize: http://www.madorn.com/resize-on-single-compute.html#.V7UPr5N95E4
- Swift version support: http://docs.openstack.org/developer/swift/overview_object_versioning.html
- Sample accounts.yaml: https://github.com/openstack/tempest/blob/master/etc/accounts.yaml.sample
- Sample tempest.conf: http://docs.openstack.org/developer/tempest/sampleconf.html#tempest-sampleconf